Account activation mailer method
model 設定好之後,接下來要撰寫發送啟動帳號郵件的程式碼。我們要使用 Action Mailer library 建立郵件程序,然後在 Users controller 的 create action 發送一封包含啟動連結的 email。Mailers 結構很像 controller action,會有個 email template 的 view。
這節的任務就是要設定寄信程序,還有設定 view,把帳號啟動需要的 activation token 和 email 加進 view 裡。
所以先來建立一個 mailer:
$ rails generate mailer UserMailer account_activation password_reset
上面同時建立了兩種方法之後會用到:account_activation、password_reset
然後 Rails 會自動幫你產生兩個 view template,一種是純文字(plain-text),另一種是 HTML,如下:
app/views/user_mailer/account_activation.text.erb
UserMailer#account_activation

<%= @greeting %>, find me in app/views/user_mailer/account_activation.text.erb
app/views/user_mailer/account_activation.html.erb
<h1>UserMailer#account_activation</h1>

<p>
  <%= @greeting %>, find me in app/views/user_mailer/account_activation.html.erb
</p>
產生的 ApplicationMailer 如下:
app/mailers/application_mailer.rb
class ApplicationMailer < ActionMailer::Base
  default from: "[email protected]"
  layout 'mailer'
end
在 ApplicationMailer 中預設了一個寄信者 email(from),整個應用中的郵件程序都會用到這個 email。(同時也設定了 email 會使用到的佈局,不過在這裡不會討論這個佈局,產生的 HTML 和純文字 email 佈局會放在 app/views/layouts 資料夾中)
產生的 UserMailer:
app/mailers/user_mailer.rb
class UserMailer < ApplicationMailer

  # Subject can be set in your I18n file at config/locales/en.yml
  # with the following lookup:
  #
  #   en.user_mailer.account_activation.subject
  #
  def account_activation
    @greeting = "Hi"

    mail to: "[email protected]"
  end

  # Subject can be set in your I18n file at config/locales/en.yml
  # with the following lookup:
  #
  #   en.user_mailer.password_reset.subject
  #
  def password_reset
    @greeting = "Hi"

    mail to: "[email protected]"
  end
end
在 UserMailer 中設定了收件者的 email。同時還有一個實例變數 @greeting,這個變數可以在 mailer 的 view 中使用。
為了要發送啟動 email,我們要先修改產生的 template,設定發信者的 email:
app/mailers/application_mailer.rb
class ApplicationMailer < ActionMailer::Base
  default from: "[email protected]"
  layout 'mailer'
end
接著我們要設定一個實例變數,值是使用者物件,然後把 email 發送給 user.email,mail 方法還可以接受 subject 參數,值就是信件主旨:
app/mailers/user_mailer.rb
class UserMailer < ApplicationMailer

  def account_activation(user)
    @user = user
    mail to: user.email, subject: "Account activation"
  end

  def password_reset
    @greeting = "Hi"

    mail to: "[email protected]"
  end
end
mailer 的 view 也可以使用 ERb,在 email 中我們要增加一個針對使用者的歡迎訊息,和一個啟動連結。我們計畫使用 email 尋找使用者,然後驗證 activation token,所以連結要包含 email 和 token。因為我們把帳號啟動視為一個資源(Account Activations resource),所以可以把 token 作為參數傳給具名路由:
edit_account_activation_url(@user.activation_token, ...)
回想一下這一行:
edit_user_url(user)
會產生像這樣的 URL 格式:
http://www.example.com/users/1/edit
所以啟動連結的 URL 會長的像這樣:
http://www.example.com/account_activations/q5lt38hQDc_959PVoo6b7A/edit
q5lt38hQDc_959PVoo6b7A 這一串就是由 new_token 方法產生的 base64 字串,可以安全地在 URL 中使用。這個值的作用跟 /users/1/edit 使用者 ID 一樣,在 Activations controller 中的 edit action 可以透過 params[:id] 取得。
為了包含 email,我們要使用「查詢參數」(query parameter),查詢參數會放在 URL 「?」後面,使用 key-value 形式指定:
account_activations/q5lt38hQDc_959PVoo6b7A/edit?email=foo%40example.com
注意,email 中的「@」變成用「%40」取代,這是轉義序列(escaped out),這樣才能在 URL 上合法使用。在 Rails 中設定查詢參數的方法是把一個 hash 傳給具名路由:
edit_account_activation_url(@user.activation_token, email: @user.email)
在具名路由使用這種方法設定查詢參數時,Rails 就會自動幫你轉義特殊字元。在 controller 中會自動反轉義 email,透過 params[:email] 可以獲取 email。
定義好 @user 實例變數之後,就可以使用具名 edit 路由和 ERb 建立需要的連結。注意,在 account_activation.html.erb 中,是使用 link_to 建立連結:
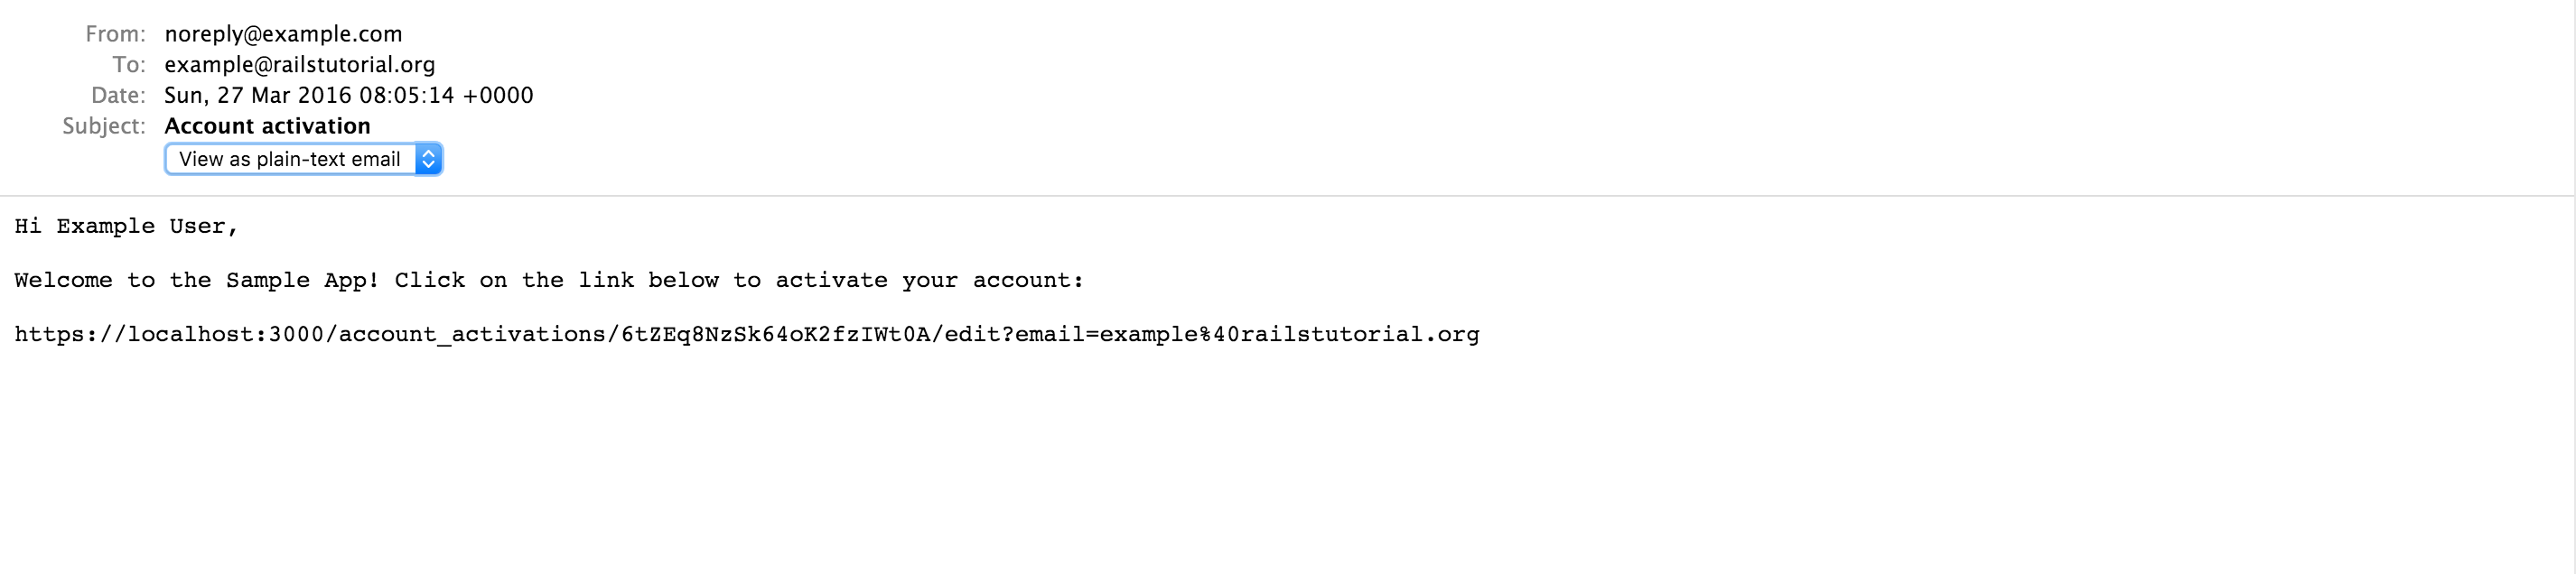
app/views/user_mailer/account_activation.text.erb
Hi <%= @user.name %>,

Welcome to the Sample App! Click on the link below to activate your account:

<%= edit_account_activation_url(@user.activation_token, email: @user.email) %>
app/views/user_mailer/account_activation.html.erb
<h1>Sample App</h1>

<p>Hi <%= @user.name %>,</p>

<p>
Welcome to the Sample App! Click on the link below to activate your account:
</p>

<%= link_to "Activate", edit_account_activation_url(@user.activation_token,
                                                    email: @user.email) %>
為了要看到上面兩個 view 的效果,我們可以使用郵件預覽功能(email previews),Rails 提供特殊的 URL,用來預覽郵件。首先,要先在應用的 development 環境增加一些設定:
config/environments/development.rb
Rails.application.configure do
  .
  .
  .
  config.action_mailer.raise_delivery_errors = true
  config.action_mailer.delivery_method = :test
  host = 'example.com'
  config.action_mailer.default_url_options = { host: host, protocol: 'https' }
  .
  .
  .
end
上面設定的 host 網址是 example.com,但實際上應該要使用開發環境的網址,例如雲端主機網址或是本地端網址:
host = 'rails-tutorial-c9-mhartl.c9.io'     # Cloud IDE
host = 'localhost:3000'                     # Local server
然後重啟 Rails server,接下來要更新 User mailer 的預覽文件(preview file),建立 mailer 時就已經自動產生:
test/mailers/previews/user_mailer_preview.rb
# Preview all emails at http://localhost:3000/rails/mailers/user_mailer
class UserMailerPreview < ActionMailer::Preview

  # Preview this email at
  # http://localhost:3000/rails/mailers/user_mailer/account_activation
  def account_activation
    UserMailer.account_activation
  end

  # Preview this email at
  # http://localhost:3000/rails/mailers/user_mailer/password_reset
  def password_reset
    UserMailer.password_reset
  end

end
因為 account_activation 方法需要一個有效的使用者物件作為參數,所以上述程式碼還無法使用。為了解決這個問題,我們要定義 user 變數,把 development 資料庫中的第一個使用者存進這個變數裡,然後作為參數傳給 UserMailer.account_activation:
test/mailers/previews/user_mailer_preview.rb
# Preview all emails at http://localhost:3000/rails/mailers/user_mailer
class UserMailerPreview < ActionMailer::Preview

  # Preview this email at
  # http://localhost:3000/rails/mailers/user_mailer/account_activation
  def account_activation
    user = User.first
    user.activation_token = User.new_token
    UserMailer.account_activation(user)
  end

  # Preview this email at
  # http://localhost:3000/rails/mailers/user_mailer/password_reset
  def password_reset
    UserMailer.password_reset
  end
end
注意,我們同時賦值給 user.activation_token,因為啟動帳號的 template 需要帳號 activation token。(因為 activation_token 是虛擬屬性,所以資料庫裡的使用者不會有 activation token)
修改完後,就可以預覽啟動帳號的 email。
HTML 版本:

純文字版本:
最後我們要編寫測試,檢查郵件內容,而 Rails 其實已經自動幫你產生有用的測試範例:
test/mailers/user_mailer_test.rb
require 'test_helper'

class UserMailerTest < ActionMailer::TestCase

  test "account_activation" do
    mail = UserMailer.account_activation
    assert_equal "Account activation", mail.subject
    assert_equal ["[email protected]"], mail.to
    assert_equal ["[email protected]"], mail.from
    assert_match "Hi", mail.body.encoded
  end

  test "password_reset" do
    mail = UserMailer.password_reset
    assert_equal "Password reset", mail.subject
    assert_equal ["[email protected]"], mail.to
    assert_equal ["[email protected]"], mail.from
    assert_match "Hi", mail.body.encoded
  end
end
上述程式碼使用了 assert_match 方法,這個方法可以匹配字串或是正規表示式:
assert_match 'foo', 'foobar'      # true
assert_match 'baz', 'foobar'      # false
assert_match /\w+/, 'foobar'      # true
assert_match /\w+/, '$#!*+@'      # false
下面的測試使用 assert_match 來檢查是否有使用者的名字、activation token 和轉義後的 email,同時也為 fixture 使用者增加了 activation token,因為 fixture 裡面沒有虛擬屬性:
test/mailers/user_mailer_test.rb
require 'test_helper'

class UserMailerTest < ActionMailer::TestCase

  test "account_activation" do
    user = users(:michael)
    user.activation_token = User.new_token
    mail = UserMailer.account_activation(user)
    assert_equal "Account activation", mail.subject
    assert_equal [user.email], mail.to
    assert_equal ["[email protected]"], mail.from
    assert_match user.name,               mail.body.encoded
    assert_match user.activation_token,   mail.body.encoded
    assert_match CGI::escape(user.email), mail.body.encoded
  end
end
注意 CGI::escape(user.email) 是用來轉義測試的 email。
可以搜尋「ruby rails escape url」,你會查到兩種方法,
URI::encode(str)和CGI::escape(str),試過之後,第二種方法會比較適合。其實還有第三種方法,ERB::Utillibrary 提供的url_encode方法。
為了讓測試通過,我們要修改 test 環境的設定,把主機網址改成正確的:
config/environments/test.rb
Rails.application.configure do
  .
  .
  .
  config.action_mailer.delivery_method = :test
  config.action_mailer.default_url_options = { host: 'example.com' }
  .
  .
  .
end
然後測試應該會通過(Green):
$ bundle exec rake test:mailers
為了在應用中使用 mailer,只需要在處理使用者註冊的 create action 增加幾行程式碼:
app/controllers/users_controller.rb
class UsersController < ApplicationController
.
.
.
def create
@user = User.new(user_params)
if @user.save
UserMailer.account_activation(@user).deliver_now
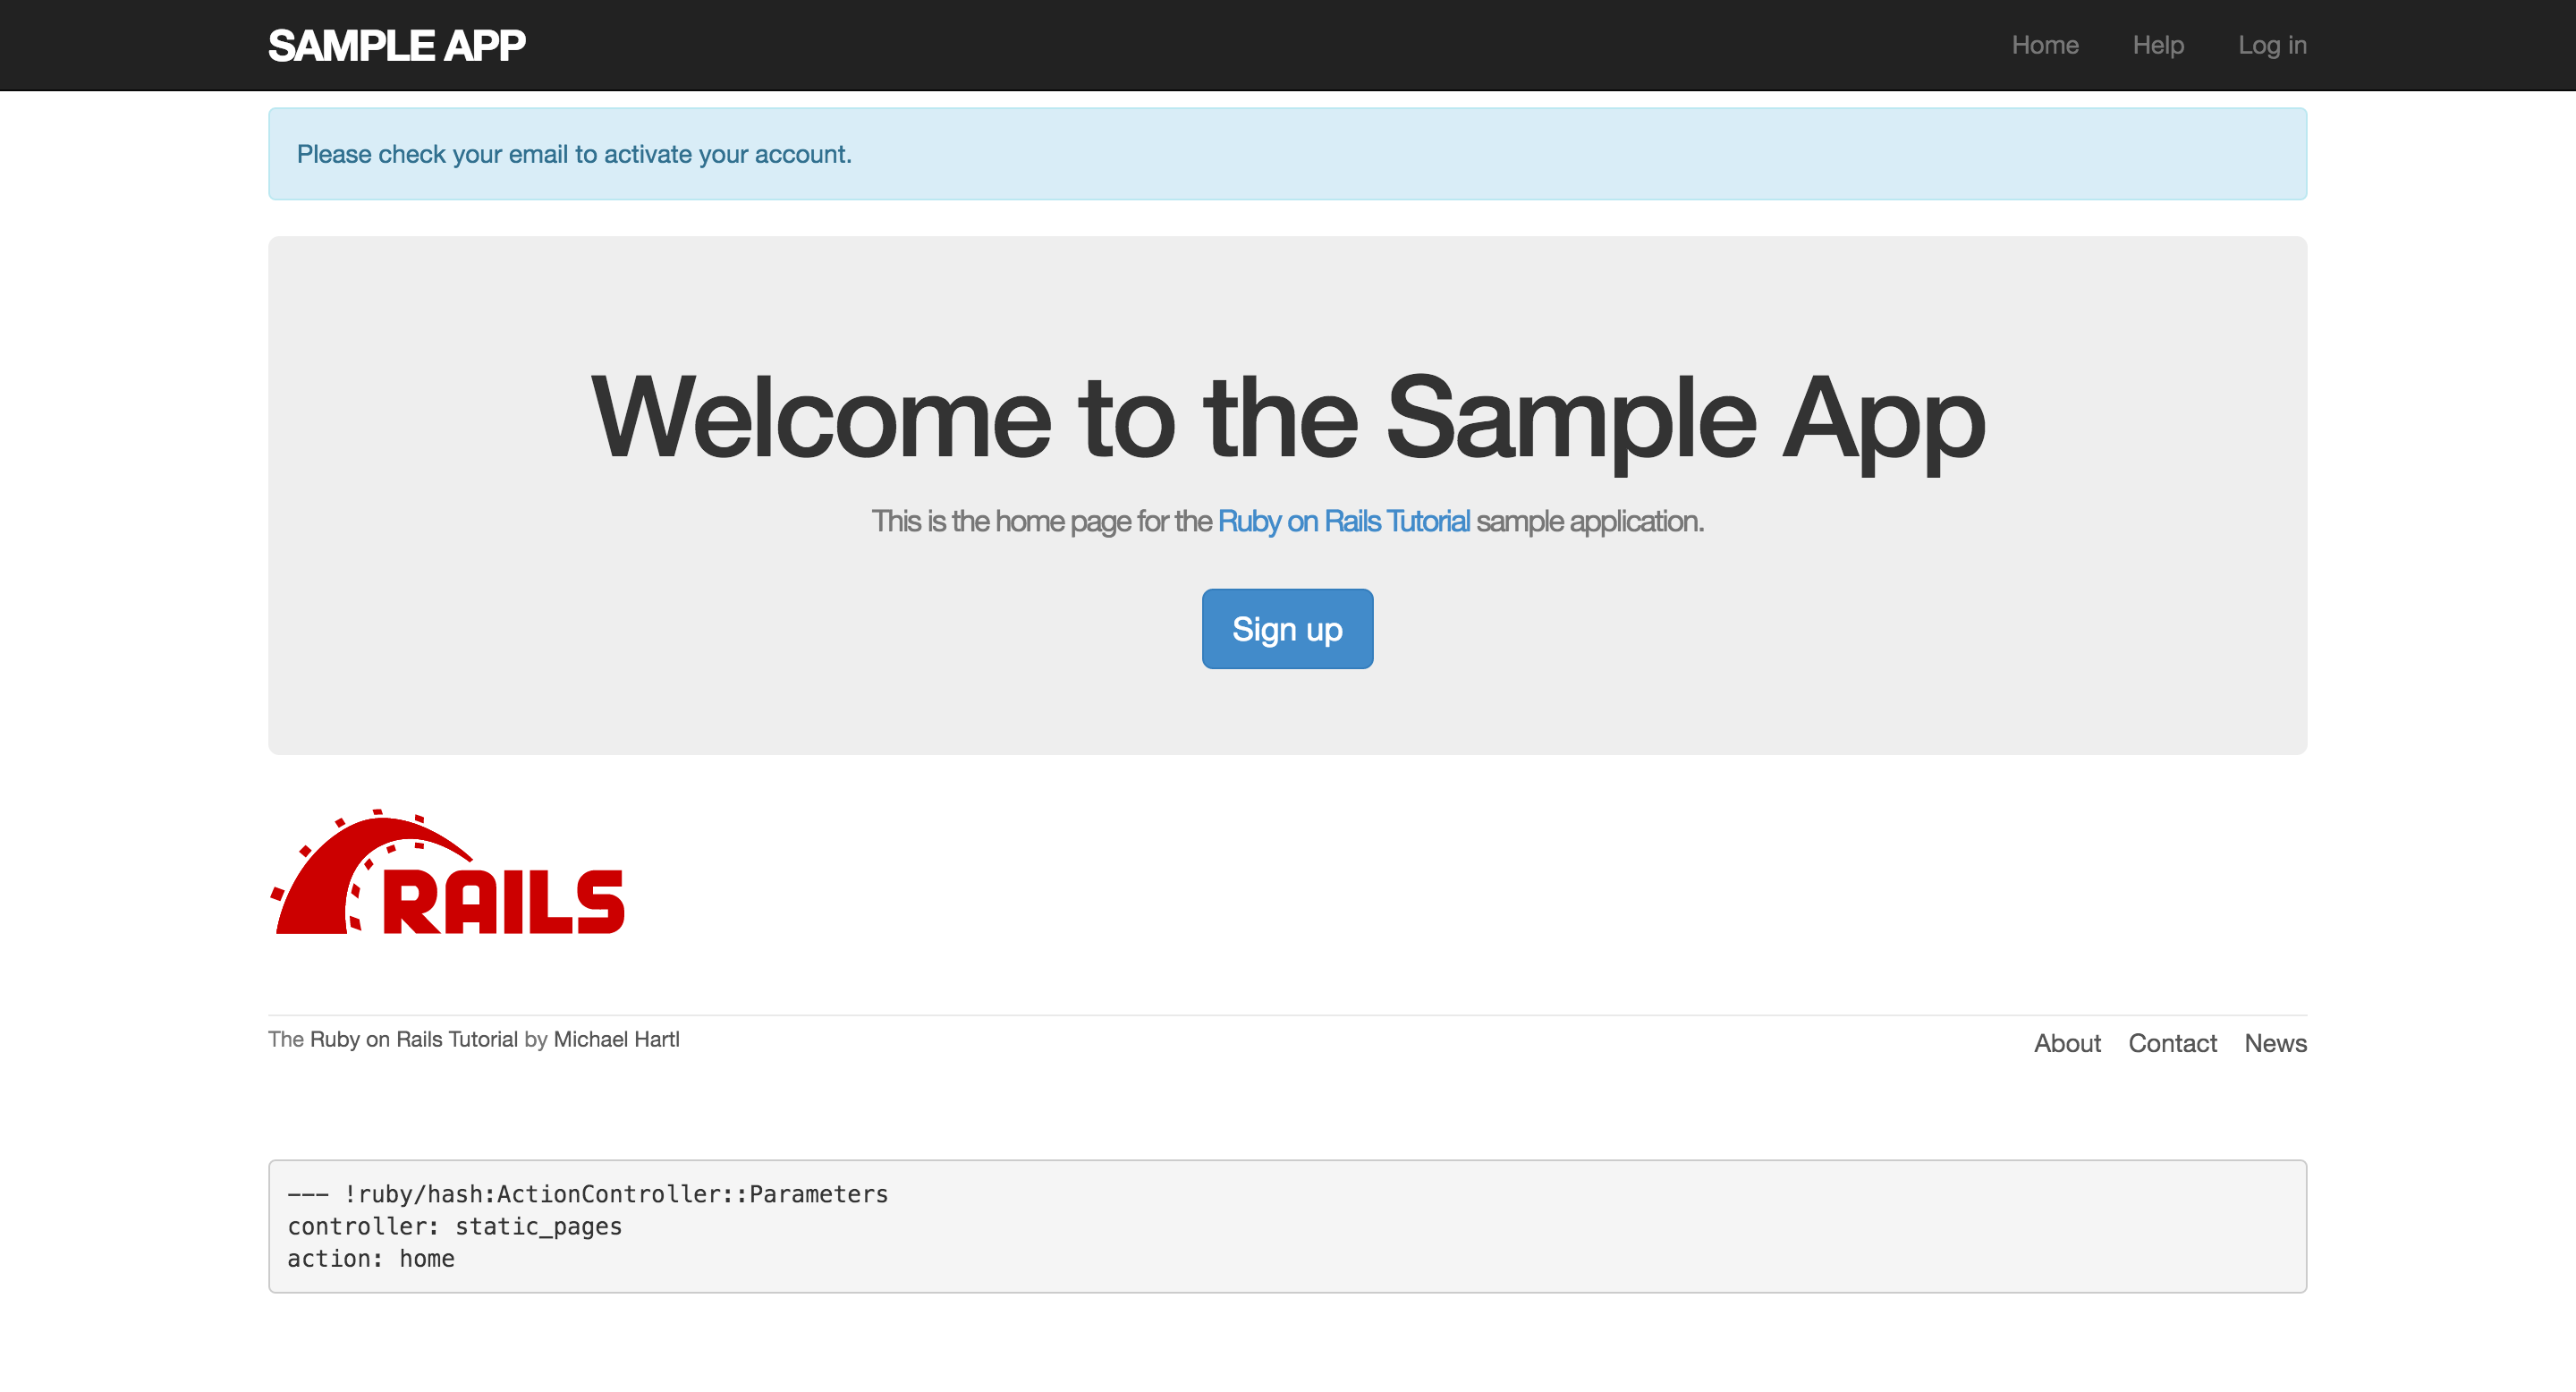
flash[:info] = "Please check your email to activate your account."
redirect_to root_url
else
render 'new'
end
end
.
.
.
end
注意上述程式碼改變了註冊後的導向網址,之前我們會直接導向到個人資料頁面,因為現在需要先啟動帳號,所以我們導向到首頁(root URL)。
因為改了導向網址,而且不會像之前一樣自動登入使用者,所以測試會無法通過,就算應用會按照我們的設計運作。所以我們暫時把會導致失敗測試的程式碼註解掉,之後會再編寫讓測試通過的程式碼:
test/integration/users_signup_test.rb
require 'test_helper'

class UsersSignupTest < ActionDispatch::IntegrationTest

  test "invalid signup information" do
    get signup_path
    assert_no_difference 'User.count' do
      post users_path, user: { name:  "",
                               email: "user@invalid",
                               password:              "foo",
                               password_confirmation: "bar" }
    end
    assert_template 'users/new'
    assert_select 'div#error_explanation'
    assert_select 'div.field_with_errors'
  end

  test "valid signup information" do
    get signup_path
    assert_difference 'User.count', 1 do
      post_via_redirect users_path, user: { name:  "Example User",
                                            email: "[email protected]",
                                            password:              "password",
                                            password_confirmation: "password" }
    end
    # assert_template 'users/show'
    # assert is_logged_in?
  end
end
如果你現在註冊,重新導向的畫面會如下:
而且會產生一封郵件:
Sent mail to [email protected] (7.1ms)
Date: Mon, 28 Mar 2016 08:21:23 +0800
From: [email protected]
To: [email protected]
Message-ID: <[email protected]>
Subject: Account activation
Mime-Version: 1.0
Content-Type: multipart/alternative;
 boundary="--==_mimepart_56f879039e144_7a43fef530b1f9492f";
 charset=UTF-8
Content-Transfer-Encoding: 7bit


----==_mimepart_56f879039e144_7a43fef530b1f9492f
Content-Type: text/plain;
 charset=UTF-8
Content-Transfer-Encoding: 7bit

Hi Signal,

Welcome to the Sample App! Click on the link below to activate your account:

https://localhost:3000/account_activations/aw26PoFm6k9U5-x2iBK_wA/edit?email=signal%40example.com


----==_mimepart_56f879039e144_7a43fef530b1f9492f
Content-Type: text/html;
 charset=UTF-8
Content-Transfer-Encoding: 7bit

<html>
  <body>
    <h1>Sample APP</h1>

<p>
  Hi Signal,
</p>

<p>Welcome to the Sample App! Click on the link below to activate your account:</p>

<a href="https://localhost:3000/account_activations/aw26PoFm6k9U5-x2iBK_wA/edit?email=signal%40example.com">Activate</a>

  </body>
</html>

----==_mimepart_56f879039e144_7a43fef530b1f9492f--
注意,你並不會在 development 環境真的發送郵件,不過你會在 server logs 上看到,之後會介紹如何在 production 環境發送郵件。